Title: A Beginner’s Guide: How to Use a Pressure Cooker
Introduction: If you’ve recently invested in a pressure cooker or are considering adding one to your kitchen, you’re in for a treat! Pressure cookers are incredibly versatile, fast, and efficient. They can help you prepare delicious meals in a fraction of the time compared to traditional cooking methods. However, for beginners, using a pressure cooker can initially seem a bit intimidating. Don’t worry—in this guide, we’ll walk you through everything you need to know about using a pressure cooker, from the basics to advanced tips.
What is a pressure cooker?
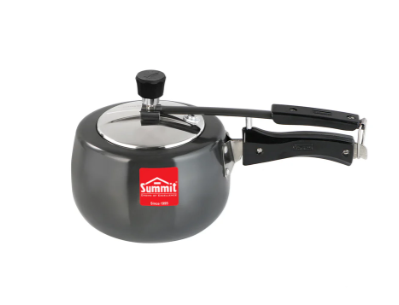
A pressure cooker is a sealed pot with a locking lid that traps steam and builds up pressure inside the cooking chamber. This high pressure increases water’s boiling point, allowing food to cook much faster than conventional methods. It’s ideal for cooking tougher cuts of meat, beans, grains, and even delicate desserts like puddings and cakes.
Why Use a Pressure Cooker?
- Speed: Pressure cookers can reduce cooking times by up to 70%. That means you can cook a hearty stew in 30 minutes instead of hours!
- Nutrient Retention: Because of the shorter cooking times and sealed environment, pressure cookers retain more nutrients than traditional cooking methods.
- Flavor: The trapped steam and pressure help to infuse flavors into the food, often resulting in richer, more intense tastes.
- Energy Efficiency: Because pressure cookers cook food faster, they use less energy than stovetop or oven methods.
Step-by-Step Guide: How to Use a Pressure Cooker
1. Prepare Your Ingredients
Before you even think about turning on the heat, ensure all your ingredients are prepared and ready. Cut ingredients into uniform sizes for the best results to ensure even cooking. It’s also important to note that you should always have enough liquid in the cooker, as the pressure relies on steam to build up.
2. Add Liquid
Pressure cookers need liquid to generate steam and create the necessary pressure. Always check your recipe for the amount of liquid required, but a good rule of thumb is to add at least 1 to 1.5 cups of liquid. Water, broth, or even wine can be used, depending on the dish you’re making. Ensure the liquid doesn’t go over the max fill line inside the cooker.
3. Secure the Lid
Once your ingredients and liquid are inside, place the lid on the pressure cooker and lock it into place. For safety reasons, most modern pressure cookers have mechanisms that prevent the lid from being opened while the cooker is under pressure. Make sure the vent valve is closed but not blocked before beginning the cooking process.
4. Set the Pressure and Cooking Time
Set your pressure cooker to the appropriate cooking pressure (usually “high” or “low”) based on the recipe. Most pressure cookers have settings for both. The cooking time will vary depending on the dish and the size of the ingredients. For example, beans might take 25-30 minutes, while a chicken stew may cook in just 15 minutes.
5. Start the Cooking Process
Turn on the heat and wait for the cooker to build pressure. This can take several minutes, depending on the amount of food inside and the heat of your stovetop. When the cooker has reached full pressure, the cooking timer will start. At this point, the cooker will begin cooking your meal under pressure.
6. Monitor the Cooker
During the cooking process, it’s essential to monitor the pressure cooker to ensure everything is functioning correctly. Some models have a pressure indicator or valve to show when the right pressure is reached. If your cooker starts making strange noises or is venting too much steam, check the instructions or troubleshoot based on your model.
7. Release the Pressure Safely
Once your food is done cooking, it’s time to release the pressure. There are two main methods:
- Natural Pressure Release: Allow the pressure to decrease on its own. This method usually takes about 10-15 minutes. It’s ideal for dishes that need rest, like meats or stews.
- Quick Pressure Release: Use the valve to manually release the steam. This method is faster and is commonly used for vegetables or delicate foods that can overcook easily.
Always use caution when releasing pressure, as the steam can be very hot.
8. Open the Lid and Serve
Once the pressure has been fully released, you can open the lid. Be cautious, as the contents may still be very hot. Stir the dish if needed, and then serve! Pressure cooking often results in very tender, flavorful meals that are ready to enjoy.
Common Mistakes to Avoid
- Not Using Enough Liquid: Always ensure there’s enough liquid in the pressure cooker. Without it, the cooker won’t build pressure properly, and food may burn.
- Overfilling the Cooker: Don’t exceed the max fill line. The pressure cooker needs space for steam to build, and overfilling could cause accidents or uneven cooking.
- Ignoring the Vent Valve: Make sure the vent valve is not clogged or obstructed, as it could lead to a dangerous buildup of pressure.
- Not Checking for Leaks: Before using, always check that the lid is properly secured and that there are no leaks around the edges.
Tips for Cooking with a Pressure Cooker
- Cut ingredients into uniform Pieces: This ensures even cooking and helps everything finish at the same time.
- Layer Ingredients Carefully: If you’re cooking meat and vegetables, place the meat at the bottom, as it requires more time to cook. Vegetables can go on top.
- Don’t Open the Lid Too Early: Be patient and allow the cooker to release pressure fully before opening the lid. This ensures optimal texture and flavor.
- Consult Your Manual: Each pressure cooker is different, so be sure to read the manufacturer’s manual for specific instructions on how to use your model.
Conclusion
With these simple steps, you’ll be able to use a pressure cooker confidently and start making delicious, fast, and nutritious meals in no time. Whether you’re cooking a comforting stew, tender meats, or beans from scratch, a pressure cooker can save you time and energy while delivering incredible flavors. As you get more comfortable using it, you’ll discover new recipes and cooking techniques to explore. Happy cooking!


